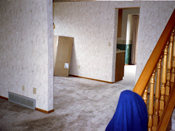
Before
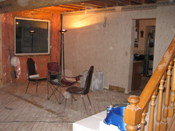
During
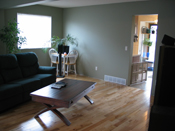
After
LIVING ROOM
|
Before |
During |
After |
The odyssey that was our living room renovation began in January 2005. Originally we had a separate living room, and formal dining room (CLICK HERE to see a floor plan). However, we really had no use for a formal dining room, and wanted a bigger living room, so after consulting with a contractor, we decided to remove the wall separating them and replace it with a support beam. We also decided that the wall-to-wall carpet had to go (dogs and carpet do not go well together), as well as the wallpaper (covering EVERY wall in the house!)
The first step was to remove the existing carpet, which was done in January '05. In March that same year we purchased natural maple pre-finished hardwood flooring to redo the new combined living room space, along with the front entrance and closet. When we pulled up the carpet, we discovered the plywood subfloor (which was over top of a tounge and groove subfloor) was quite weathered/damaged, so in June '05 we decided to pull up the plywood too. It was around this time we also noticed that our front 5-pane bay window was leaking - the drywall under the window seemed to be rotten and molding. This window was the original wood-frame window. The other window in the room (the dining room picture window) had already been replaced with a white PVC one by the previous owners due to hail damage. So we called around a got a few estimates on replacing the bay window - seemed we were looking at around $6000+ !! Definitely not money we had lying around. So we let things sit while we tried to figure out what to do.
In March of 2006 we decided to take out the separating wall, and replace it with the beam. What a learning experience! This was when we first discovered the incompentencies of the people who built our house (more on this later)... The wall we removed was not a support wall, but we did want to maintain structural integrity, so after consulting with a contractor, we replaced it with 4 2"x12"x18' laminated wood beams that we lag bolted together - a bit of overkill, yes, but we wanted to be safe! These were supported by 2 2"x8" boards screwed together on each end of the beam. Yay - we finally had one room instead of two! However, when we took down the wall, to make room for the beam, we ended up having to replace the drywall on both ends of the former dining room, as well as the ceiling. Also, when we took down the wall, we discovered an electrical nightmare with the wiring - it seems the dining room chandelier, a light in one of the bedrooms on the second floor, and the laundry room light were all wired on the same line... crazy!! Luckily my Dad is quite handy with that sort of thing, and he was able to easily rewire it properly.
In April 2006 we got around to installing the new thicker plywood/OSB subfloor (to reinforce the floor and prevent squeaking of the new hardwood). At the same time we also started removing the wallpaper - another 'fun' experience! The previous owner had a 'thing' for wallpaper, and had covered the entire place in it. The newest stuff was in the living/dining room - it was the shiny textured vinyl type. Well, after several attempts and several different methods of removal we discovered that the top vinyl layer was easy to peel off, leaving the paper under-layer, which we needed a wallpaper steamer and a knife blade/scraper to remove. However, it left a sticky glue residue all over the walls, that never ever dried. About a year later, I finally found something to remove this substance - straight varsol! It was a horrible job...I had to wipe down every previously exisiting wall in the living/dining room with varsol twice, and then scrub with soap and water to remove the varsol. My mom helped me for a bit and had a terrible allergic reaction! Yeah, I can't wait to have to do it in the kitchen and back hallway... :(
From that point on, the living room sat for over a year, until we decided to continue. However, during that period I spent a lot of time testing paint colours. I had a 2'x4' piece of drywall I was test painting, and when I found the colour I wanted, I actually test painted 3 large spots on the existing walls (you can see this in some of the pictures). I finally picked a grey/green/olive colour called 'Perpetua' from General Paint, along with its related lighter tone ('Harvard') which I will use in the front entrance/stairs, and back hallway. Once I had picked a colour, I felt like I was finally getting somewhere, but I still couldn't do much more at that point. One of the biggest hurdles was getting the bow window replaced, and we had to talk to the bank for that. In May of 2007 we were finally able to order the new window, which we did through Rona who gave us a quote of only about $4500 ($1500 less than the other quotes). There was an issue though - when the original window was made, it was done as a fully assembled piece, but nowadays, they don't make bow windows that way (actually they don't really make them much at all anymore), so instead they had to order us 5 separate windows that they would assemble together in the one window on site. We chose to get casements (crank-opening) windows on both ends as we have no opening windows on the main floor of the house, and we wanted to increase the air flow in the summer.
The window was supposed to take 6 - 8 weeks to arrive, and then they would call us to book the installation appointment. Well, we kind of forgot about it over the summer, and then around September I remembered and called them up to find out where the window was. Turns out they made some paperwork error, and the order never went to the manufacturer, and apparently no one was keeping tabs on it, so no one noticed - good thing I finally called!! They agreed it was their fault, and contacted the manufacturer, and said they could get it rushed in 4 weeks if I still wated it, so we proceeded. 6 weeks later (October) and I still hadn't heard anything, so I called again. The windows were there, but no one had told the install guys to call me to book an appointment. I finally get a hold of the install guy, and get an appointment for the last week of November. Steve (the install guy) comes and starts ripping out the old window - can't figure out why it's so hard to detach the top, when he discovers that they had driven 2 1/2" spikes from the header board straight through into the window casings! So he has to rip out some of the header as well. When he's taking out the support boards below the window, we discover that the wall below the window is completely rotten, to the point that he cannot install the new windows on top of it. This is a kink in the plans. He suggests that he can rebuild the wall and still have the windows in by the end of the day, but that it will be extra to the tune of $1500! Not much I can do about it, so I tell him to proceed, and quickly try to find some $$'s! The window was mostly completed the first day, and Steve came back to do some finishing bits the second day, but the cladding had to be ordered (we are getting it dark brown to match the rest of the house), as well as new siding for the front bottow portion of the bay (the old siding was destroyed during removal), so it won't be fully complete until sometime in the new year. But it's sealed and installed, so good enough for now! YAY, we finally have a new window!! And it opens!!! And Steve was able to score us a deal from the manufacturer since they screwed up the order, and we only had to pay an extra $450 instead of $1500.
Once the window was done (late November 2007), I got an itch to finish everything before the end of the year - we were going on three years without a living room, and I was getting quite tired of everything. I told Nathan that all I wanted for Christmas was to get the living room done, and that we could take whatever money we would spend on each other and put it into the house. Nathan had decided he wanted the drywalling, mudding, sanding, and painting to be done before the floor was put in, so that was the next task. Luckily my mom has done this type of work before, and is quite motivated, so she provided the expertise and kept me on track! First we had to scrape the existing stipple off the living room and entrance ceilings. Because we had to replace the drywall in the former dining room, we were going to restipple everything so it would match. 2 days after the window was put in, the stipple came off! We sprayed the ceiling down with a mist of water, and then took ice scrapers to it - my shoulders were so sore! At this point, we knew we had to do something about the banister, because the drywall where it attached at the middle of the staircase was damaged during the beam installation, and we needed to fix and paint that section of the wall to complete the living room. So one night when the boys had been having a few beers out in the garage, I called one of them in and we tackled the banister and railing, and after much sweat, swearing, and beating, we were able to rip it out! I had thought that I wanted to replace it with a maple banister and railing to match the flooring, but after a few days of living with it, we decided we like it open and will leave it that way. There is a handrail on the other side of the staircase (currently removed so we could take off the wallpaper), and we have no small children so safety is not really a concern.
Next we had to replace/rebuild the drywall around the new bay window (I won't tell that story, but safe to say the original framing for the window was not nice to work with), and drywall the beam as we had decided to paint it. After much discussion we finally decided to go with rounded metal drywall corners on both the beam and the opening for the bow window, and it was one of the best decisions we made. It ended up looking fantastic, and solved a few problems too! Before We had to mud and tape all of the new drywall, then sand it down. Then do the first round of patching on all the previously painted walls and the ceiling, and remud the taped portions, and then sand it down again. Then do the final round of patching and sand down any last parts to make everything smooth. I learned that mudding/patching is kinda fun, and I don't HATE sanding, but that I really don't like the dust, and don't want to do it again anytime soon!! At least we had the opening windows which really helped for that!
By mid December, all the walls and ceiling were ready, and on December 17th we primered everything. Then came the stippling of the two portions of the ceiling (on either side of the beam). Again my Dad helped as he had done this before, and between him and Nathan they got it all figured out. But it did make a huge splattering mess all over the walls, so I had to wash everything down again. On December 21, the first coat of paint went on - let me tell you it was a very exciting day!! To see all of my hard work finally getting somewhere! Second coat went on the next day, along with wiring and installation of the new outlets and instlaling a new doorbell and entrance ceilig light (which my Dad and I did). We were done by December 22, except for the flooring, so we decided to take a couple of days off for Christmas! :)
For a few months I had been contemplating what to do in the front entrance. Originally we were going to just continue the hardwood, but I was worried that it would not be ideal for a high-traffic entrace situation, and that it would just get wrecked. I had considered many different options ranging from vinyl to porcelain tile to travertine marble (so beautiful!!), but I couldn't make a decision between what I liked, the cost, and the fact that most of it would be either in the closet, or covered by a mat at the front door, so did I really want to use something expensive I loved but would never see? In the end, Nathan actually made the decision, and chose black granite tile! We got it from Home Depot, and on December 28th, we layed it ourselves, and did a pretty good job! The tile wet saw was kind of fun (I ended up with coasters from the leftover pieces!), the morter and grout took quite a bit of effort to work with, and the install spanned over a week with all the different 'phases'. It looks fantastic, and it is durable and ideal for high-traffic. It has also made us think we might like to have a black granite countertop in the kitchen eventually.
Last but not least was the hardwood!! Almost 3 years after I bought it, it was finally getting installed! On December 29th, Grant and Laz came over to help, and we made short work of the first half of the room. The next day, Nathan and I completed the rest, and by the end the Home Depot rental department guys were very familiar with us! :) The majority of the reno was finally done, and being December 30 it was just in time! On New Year's Eve, we moved all the furniture back upstairs, and had a living room again!
We do have a few outstanding items here and there. Still need to do baseboards and window trim. Will be going with white lacquered MDF which means stinky painting, so that will have to wait until the weather's nice enough to do it outside, or at least in the garage (spring). Grant also has to finish the transition piece from the hardwood to the granite - needs a router to align the edges of the hardwood boards. Hopefully this will be done in the next few weeks. The rest is furniture related - I bought the items to make my new library by the bow window (desk, bookcase, lamps), but I still need to get the 4 bokcases for the DVDs (which will line the empty wall backing the kitchen - the white dinette will go away) - I am waiting for IKEA to restock them. I also have to hang my large piece of art above my sofa table (a copy of Scott Steele's 'Open Skies' currently leaning against the wall on my sofa table - see picture in 'After' gallery), and choose what I will put up for other art over my desk, and on the open spaces in the living room area. Now that we have no dining room, we also have no kitchen table, but I specifically chose a sofa table (and coffee/cocktail table) that folds open to double in size (see picture in 'After' gallery), which can comfortable seat six, and which I will use as a dining table when needed. I can simply slide the couch and table out of the way, bring in some chairs, and set up for a dining area. I do need to get dining chairs though - one of which I will use at the desk in my library. I guess I'll have to store the rest downstairs or in the garage. At some point I also want to replace the green couch with a black leather couch and love seat - there's lots of room for more seating!
As for next steps, I'd really like to get the entrance, stairs, and upstairs hallway done (they're all kind of one area), since they are almost part of the living room. That will involve removing the carpet from the stairs (which I will be doing within the next few months), refitting all of the mahogany on the stairs with maple and doing maple hardwood treads (Grant will do this), maple hardwood on the landing and hallway upstairs, new maple frosted glass bi-fold closet doors, new steel insulated front door, removing the rest of the wallpaper in the staircase and hallway (yay, the varsol trick again... :( ), new opening window in the hallway landing (it's small so shouldn't be a big deal and can do ourselves), repairing the rotten/moldy portions of drywall under the leaky landing window (fun...), paint ceiling stipple in staircase and hallway (or scrape and replace, but that's a lot of work), and eventually new maple (or possibly white painted) closet and room doors for the hallway, but will probably just do closets first, and leave rooms for when they are each renovated.